
Help centre
Activate your eSIM in minutes
Installation method
Your eSIM only connects once you are in your destination country. Install it before you leave, over Wi-Fi: validity starts at the first connection to a local network, not at installation.
-
Step 1 of 5
Install the eSIM profile in one tap
Open your RapideSIM confirmation email on your iPhone and tap the Quick Install link. iOS opens the eSIM installer with everything pre-filled: tap Continue and follow the screens.
Note Works on iOS 17.4 and later. On an older iOS, use the QR code or the manual method. -
Step 2 of 5
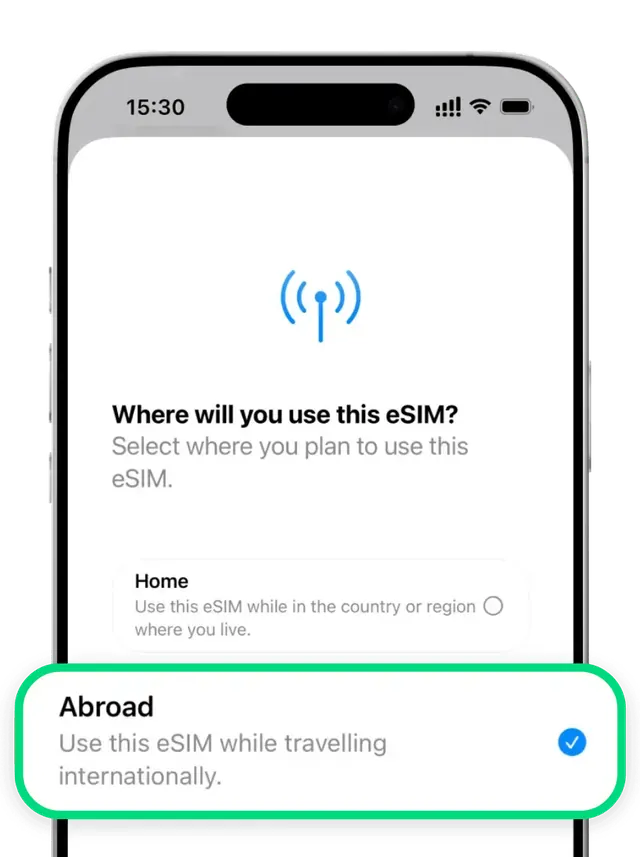
Choose "Abroad"
This eSIM is for travelling outside your country.
-
Step 3 of 5
Choose "Data Only"
This plan is internet only. Calls and SMS stay on your main SIM, and WhatsApp keeps working with your usual number.

-
Step 4 of 5
Turn on the eSIM line
Go to Settings → Cellular → your eSIM and turn on "Turn On This Line". Then, under Cellular Data, select this eSIM as your data line.

-
Step 5 of 5
Enable Data Roaming
On the eSIM line, scroll down and turn on "Data Roaming". Without it, the eSIM cannot connect.
Important Data roaming must be ON for the eSIM to work. No extra charge with RapideSIM: your plan already includes it. Do turn it off on your personal line, though, to avoid charges from your home carrier.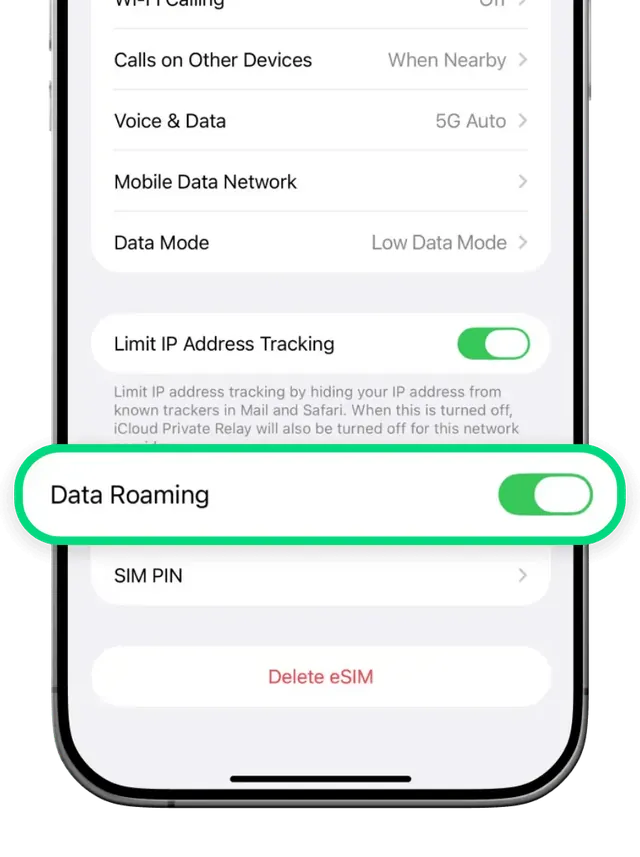


-
Step 1 of 5
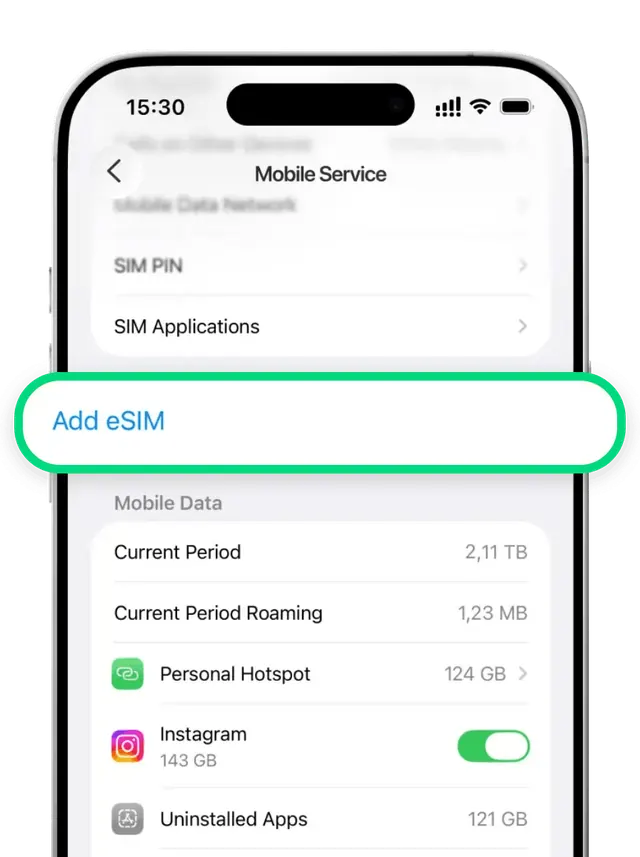
Enter the SM-DP+ address and the activation code
Go to Settings → Cellular → Add eSIM → Use QR Code, then tap Enter Details Manually. Paste the SM-DP+ address and the activation code from your confirmation email.
Both are in your RapideSIM confirmation email, under the QR code.


-
Step 2 of 5
Choose "Abroad"
This eSIM is for travelling outside your country.
-
Step 3 of 5
Choose "Data Only"
This plan is internet only. Calls and SMS stay on your main SIM, and WhatsApp keeps working with your usual number.
-
Step 4 of 5
Turn on the eSIM line
Go to Settings → Cellular → your eSIM and turn on "Turn On This Line". Then, under Cellular Data, select this eSIM as your data line.
-
Step 5 of 5
Enable Data Roaming
On the eSIM line, scroll down and turn on "Data Roaming". Without it, the eSIM cannot connect.
Important Data roaming must be ON for the eSIM to work. No extra charge with RapideSIM: your plan already includes it. Do turn it off on your personal line, though, to avoid charges from your home carrier.


-
Step 1 of 5
Scan the QR code
Show the QR code on another screen (or print it). On your iPhone, go to Settings → Cellular → Add eSIM → Use QR Code and scan it with the camera.
Your QR code is in the confirmation email. Keep it: it can only be installed on one device, but it lets you reinstall the eSIM on that same phone if it gets deleted.
-
Step 2 of 5
Choose "Abroad"
This eSIM is for travelling outside your country.
-
Step 3 of 5
Choose "Data Only"
This plan is internet only. Calls and SMS stay on your main SIM, and WhatsApp keeps working with your usual number.
-
Step 4 of 5
Turn on the eSIM line
Go to Settings → Cellular → your eSIM and turn on "Turn On This Line". Then, under Cellular Data, select this eSIM as your data line.
-
Step 5 of 5
Enable Data Roaming
On the eSIM line, scroll down and turn on "Data Roaming". Without it, the eSIM cannot connect.
Important Data roaming must be ON for the eSIM to work. No extra charge with RapideSIM: your plan already includes it. Do turn it off on your personal line, though, to avoid charges from your home carrier.
-
Step 1 of 6
Install the eSIM profile in one tap
Open your confirmation email in Gmail or Chrome on your phone and tap the quick-install link. Android opens "Add eSIM" with everything pre-filled: confirm the download.
Note Requires Android 10 or later with up-to-date Google services. Open the link from Gmail, Chrome or an SMS, not from WhatsApp. -
Step 2 of 6
Open the SIM manager
Go to Settings → Connections → SIM manager. Your new eSIM appears in the list.

-
Step 3 of 6
Turn on the eSIM and select it for mobile data
Turn on the eSIM line, then under Preferred SIMs choose it for Mobile data. Keep your main SIM for calls and messages.

-
Step 4 of 6
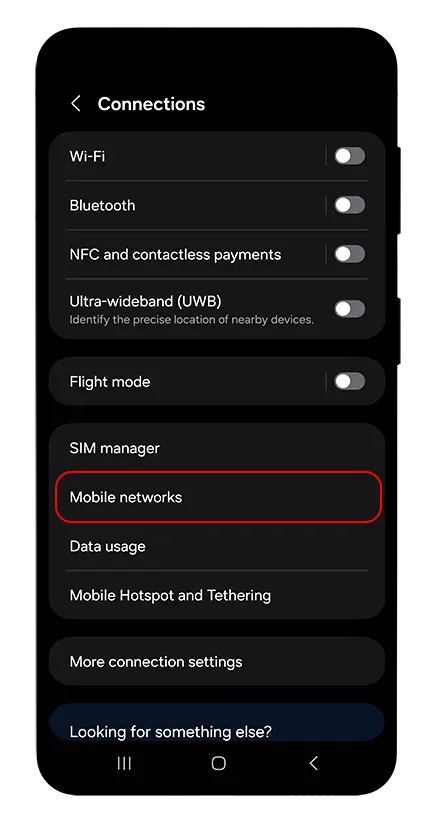
Open Mobile networks
Go back to Connections and tap Mobile networks.
-
Step 5 of 6
Find "Data roaming"
The Data roaming switch is at the top of the Mobile networks screen. It is off by default.

-
Step 6 of 6
Enable Data roaming
Turn on "Data roaming". It is required for the connection abroad.
Important Data roaming must be ON for the eSIM to work. No extra charge with RapideSIM: your plan already includes it. Do turn it off on your personal line, though, to avoid charges from your home carrier.


-
Step 1 of 6
Enter the SM-DP+ address and the activation code
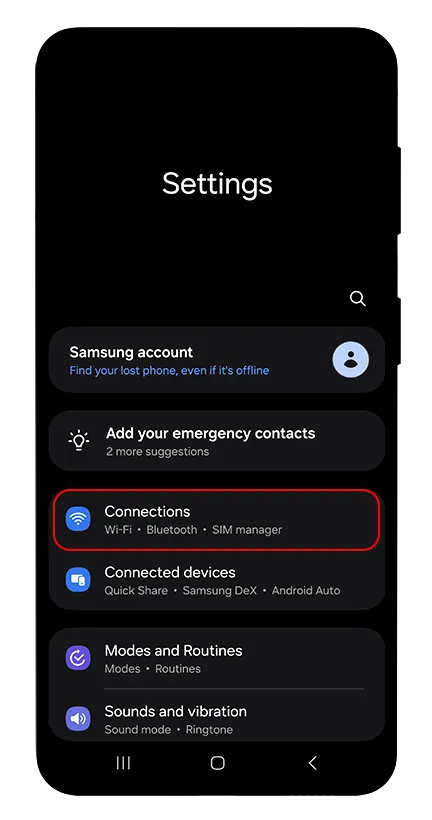
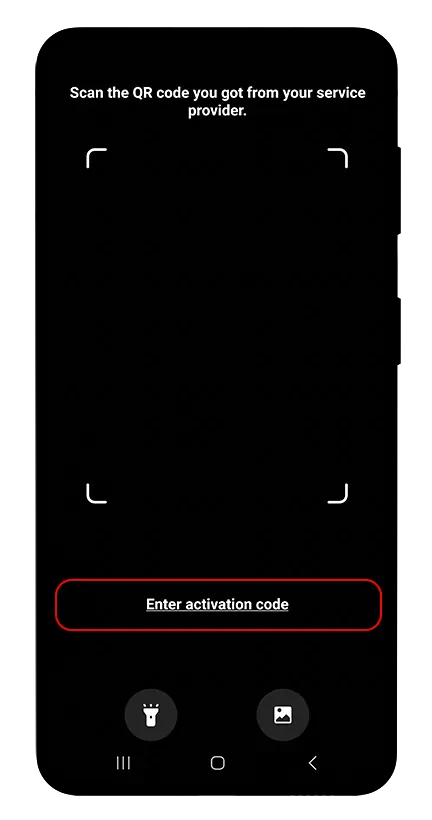
Go to Settings → Connections → SIM manager → Add eSIM, then tap Enter activation code. Paste the SM-DP+ address and the activation code from your confirmation email.
Both are in your RapideSIM confirmation email, under the QR code.

-
Step 2 of 6
Open the SIM manager
Go to Settings → Connections → SIM manager. Your new eSIM appears in the list.
-
Step 3 of 6
Turn on the eSIM and select it for mobile data
Turn on the eSIM line, then under Preferred SIMs choose it for Mobile data. Keep your main SIM for calls and messages.
-
Step 4 of 6
Open Mobile networks
Go back to Connections and tap Mobile networks.
-
Step 5 of 6
Find "Data roaming"
The Data roaming switch is at the top of the Mobile networks screen. It is off by default.
-
Step 6 of 6
Enable Data roaming
Turn on "Data roaming". It is required for the connection abroad.
Important Data roaming must be ON for the eSIM to work. No extra charge with RapideSIM: your plan already includes it. Do turn it off on your personal line, though, to avoid charges from your home carrier.

-
Step 1 of 6
Scan the QR code
Show the QR code on another screen (or print it). On your phone, go to Settings → Connections → SIM manager → Add eSIM and scan it.
Your QR code is in the confirmation email. Keep it: it can only be installed on one device, but it lets you reinstall the eSIM on that same phone if it gets deleted.
-
Step 2 of 6
Open the SIM manager
Go to Settings → Connections → SIM manager. Your new eSIM appears in the list.
-
Step 3 of 6
Turn on the eSIM and select it for mobile data
Turn on the eSIM line, then under Preferred SIMs choose it for Mobile data. Keep your main SIM for calls and messages.
-
Step 4 of 6
Open Mobile networks
Go back to Connections and tap Mobile networks.
-
Step 5 of 6
Find "Data roaming"
The Data roaming switch is at the top of the Mobile networks screen. It is off by default.
-
Step 6 of 6
Enable Data roaming
Turn on "Data roaming". It is required for the connection abroad.
Important Data roaming must be ON for the eSIM to work. No extra charge with RapideSIM: your plan already includes it. Do turn it off on your personal line, though, to avoid charges from your home carrier.
Other Android (Pixel, Xiaomi, Oppo…): the path is Settings → Network & internet → SIMs → Add eSIM, then Mobile data and Roaming in the same menu.
Pro tips
Install before you travel
Install your eSIM 1 to 2 days before departure, over Wi-Fi. Nothing is used before the first connection at destination: you have up to 180 days after purchase.
Check compatibility
iPhone XS/XR and later, Samsung Galaxy S20 and later, Google Pixel 3 and later support eSIM. The phone must be carrier-unlocked.
Japan: set the APN
The APN sets itself everywhere except Japan, where it must be "vmobile.jp". Enter it in your eSIM's data network settings if you have no internet on arrival.
Need help?
The situations we see most often, and how to fix them in a few steps.
"Unable to Activate eSIM"
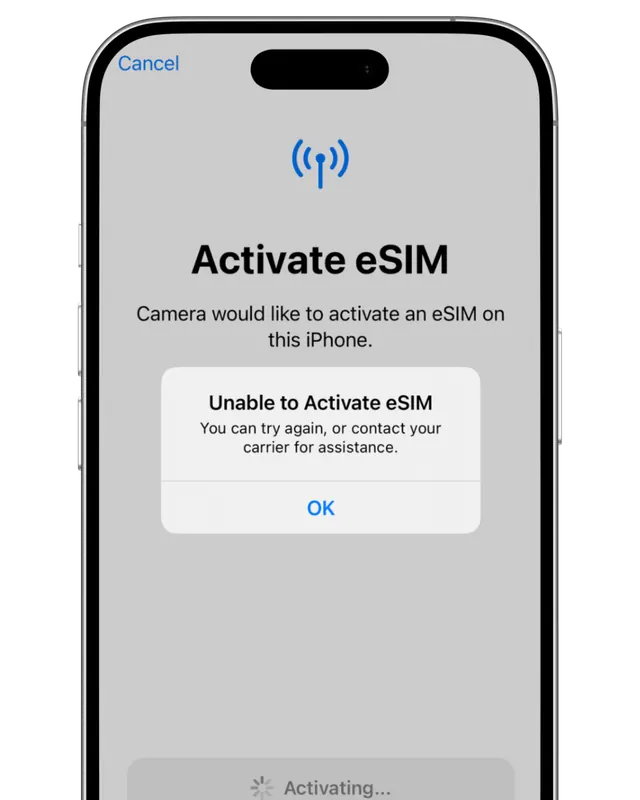
Don't panic, this is normal. The message shows when the eSIM is not yet connected to a compatible network: at home, before you leave, there is none.
Still nothing at your destination?
- Restart your phone and wait a few minutes.
- Turn Airplane Mode on for 30 seconds, then off.
- Settings → Cellular → your eSIM: turn "Turn On This Line" off, then on again.
On Android, the same settings live under Settings → Connections → SIM manager and Mobile networks.
Check whether the eSIM is installed and how much data is left
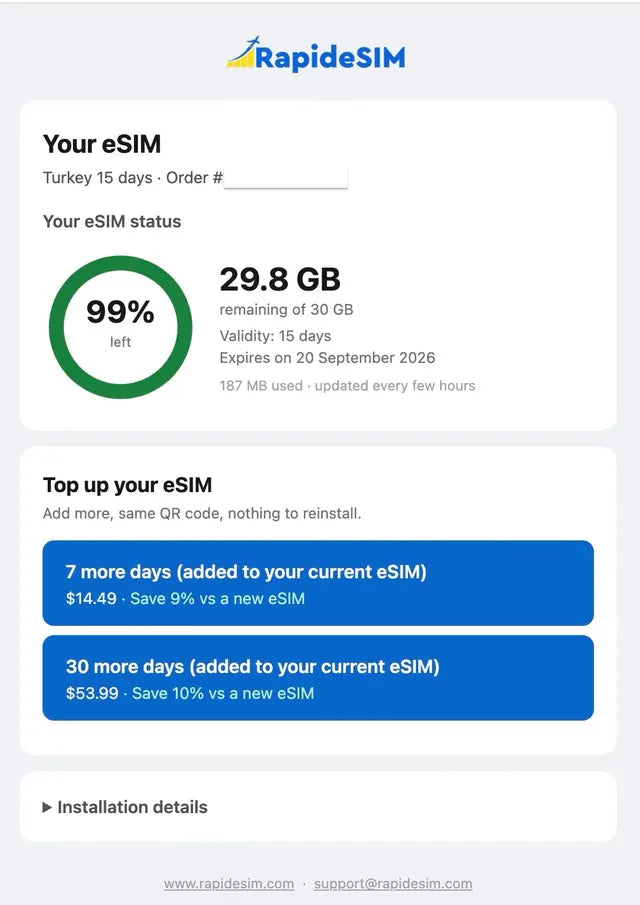
RapideSIM has no app to install: everything is on the top-up page. Enter your order number or the ICCID of the eSIM to see its status (installed or not), remaining data, validity and expiry date, updated every few hours.
The same page lets you add days or data to the eSIM you already installed: same QR code, nothing to reinstall.
Find the right eSIM on your phone
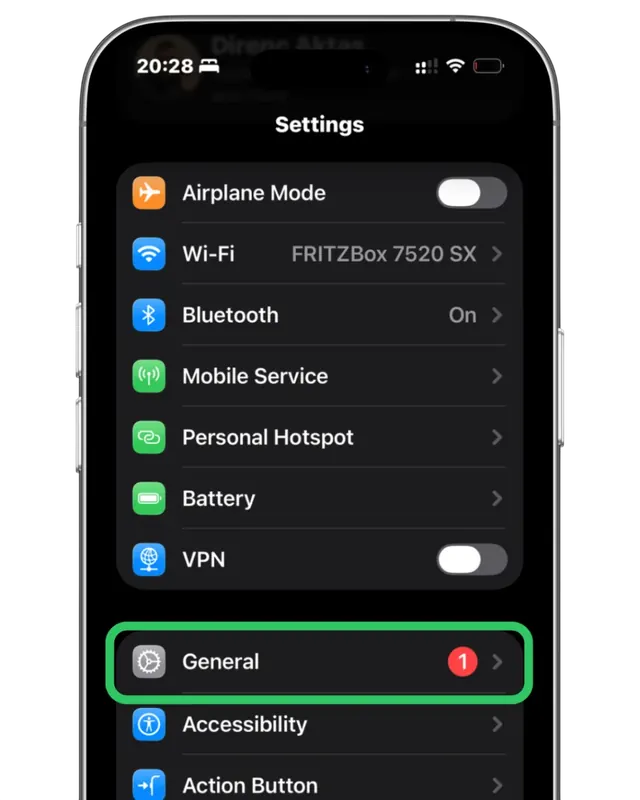
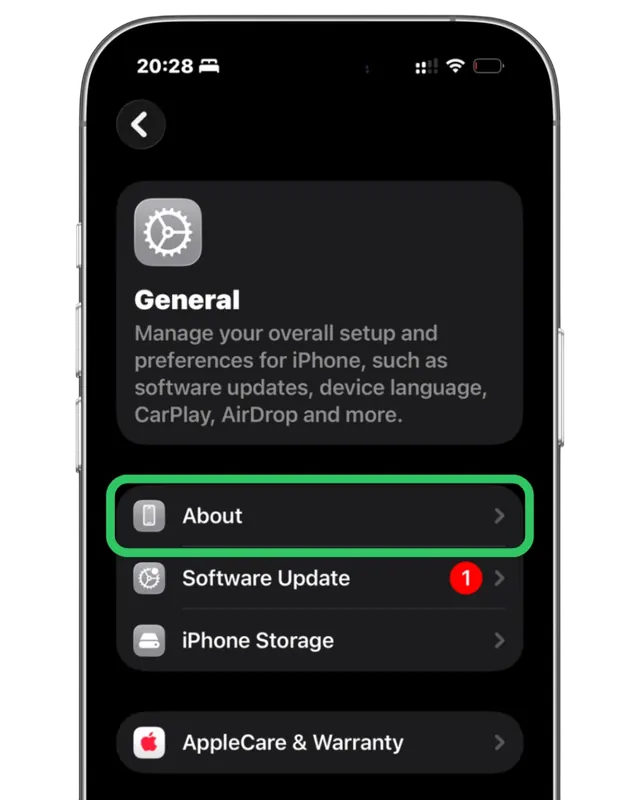
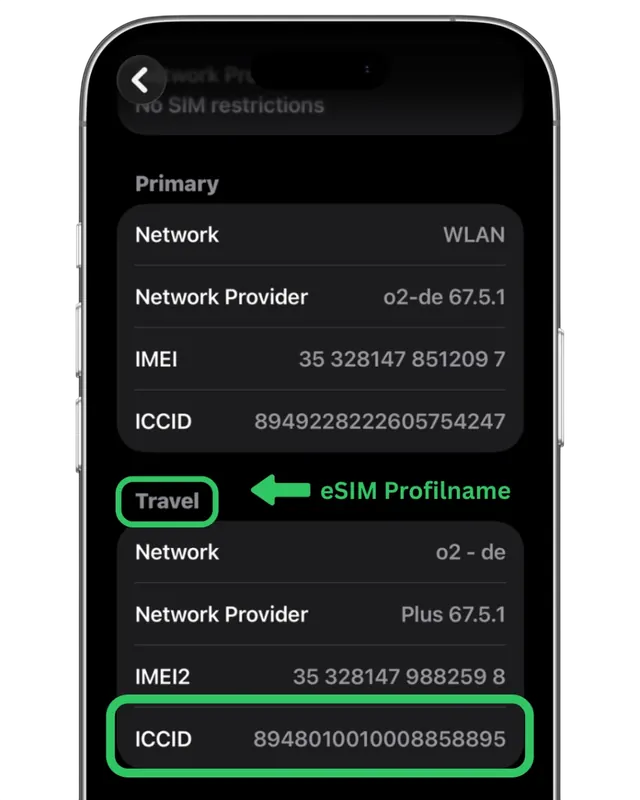
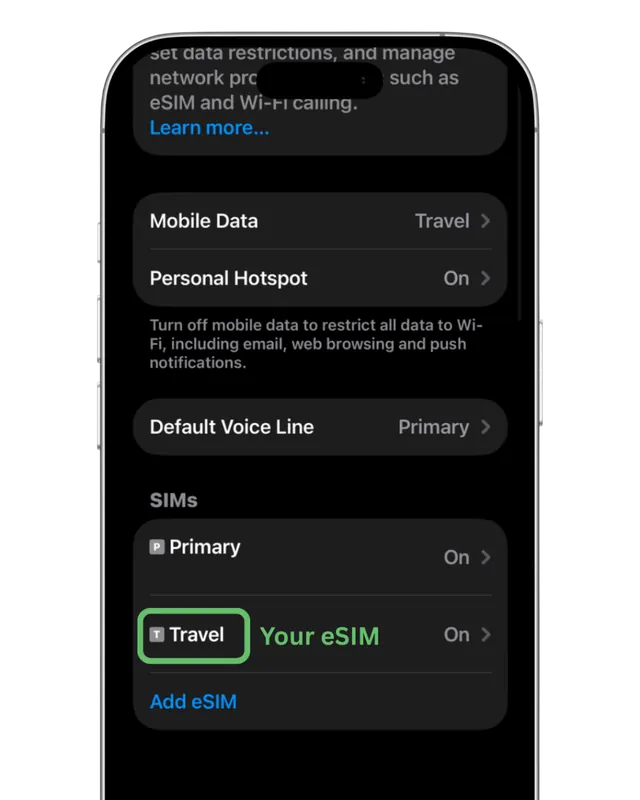
If several eSIMs are installed, you need to find the RapideSIM one. Its ICCID is in your confirmation email and on the top-up page.
Then go to Settings → General → About and scroll to the SIM blocks: the one whose ICCID matches is your RapideSIM eSIM. Its label ("Travel", or the name you chose) is what shows under Settings → Cellular.
On Android, the same settings live under Settings → Connections → SIM manager and Mobile networks.
No internet connection
Your eSIM only works and activates in the destination country. If you are there and still have no internet, check:
- Is Data Roaming on? Settings → Cellular → your eSIM → Data Roaming must be ON.
- Is the right SIM selected for data? Settings → Cellular → Cellular Data → select your RapideSIM eSIM.
- Is "Turn On This Line" enabled? Settings → Cellular → your eSIM → must be ON.
- Is "Allow Cellular Data Switching" off? Settings → Cellular → turn it off so you don't fall back on your main SIM's data.
On Android, the same settings live under Settings → Connections → SIM manager and Mobile networks.
The QR code says "invalid"
Each eSIM QR code installs only once. "This code is no longer valid" or "already used" almost always means the eSIM is already on your phone: no need to scan it again.
Check under Settings → Cellular whether an eSIM line already exists, or look up its status on the top-up page with your order number.
Wrong network near a border
Near a border, your phone may latch onto the neighbouring country's network, where your plan is not valid: you see signal bars, but no data.
Pick the network manually: Settings → Cellular → your RapideSIM eSIM → Network Selection → turn off "Automatic" → choose a network of the country you are in.
No internet in Japan: set the APN
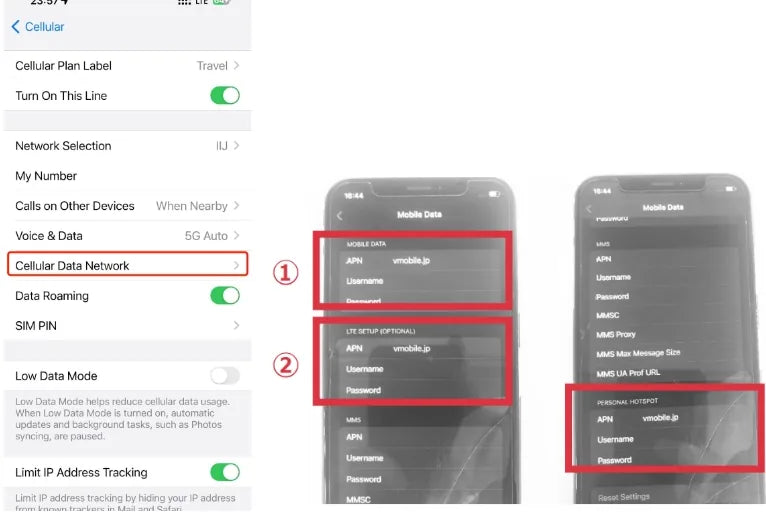
The APN (the operator's access point) sets itself in all our destinations, and hotspot sharing works by default. The one exception is Japan, where the APN must be "vmobile.jp". Without it you have signal but no data.
iPhone: Settings → Cellular → your eSIM → Cellular Data Network. Enter vmobile.jp in the APN field under "Cellular Data" (and under "Personal Hotspot" if you share your connection), then make sure Data Roaming is on.
Android: Settings → Connections → Mobile networks → Access Point Names → Add. Name and APN: vmobile.jp. Save, then select it.
Why can't I install my eSIM?
If the QR code or the manual installation fails, check these five points:
- Your phone is unlocked. An eSIM cannot be installed on a carrier-locked or contract phone: ask your carrier to unlock it.
- Your phone supports eSIM.
- You have a good internet connection (Wi-Fi or data): the eSIM profile is downloaded during installation.
- You are not behind a firewall: some corporate or public networks block the download.
- The QR code has not already been scanned on another device: each eSIM can be installed once only.
Install on iPhone · Install on Samsung · Check compatibility
Can I transfer my eSIM to a new phone?
Not once it has been activated: an activated eSIM is tied to the phone it was installed on and cannot be moved. If you had not activated it before changing device, you can still use it on the new one.
What should I send support to get help faster?
Via WhatsApp, chat or email, send us:
- your order number;
- the ICCID of the eSIM (in the confirmation email, and on the phone under Settings → Cellular → your eSIM);
- your phone model;
- a screenshot of the error or of the cellular settings.
With these details, the problem is usually fixed in the first reply.
Not working?
- Restart the device
Switch your phone off completely, wait 10 seconds, then switch it back on.
- Check the connection
To install, be on stable Wi-Fi and not on a call. At destination, check roaming and the data line above.
- Contact support
Our team is available 24/7 to sort out installation problems. Send your order number and a screenshot.